
My training programs, regardless of sport, are always built around a handful of staple or “fundamental” movements. These movements in large part include the squat, hip hinge, lunge (in all planes), and upper body push and pull movements.
The order of those movement categories should be noted, as they are generally listed from most to least difficult to learn for the athlete. The hip hinge is one of the first movements listed, and for good reason: it is very difficult for most athletes to learn. Yet, you can walk into a high school weight room anywhere and oftentimes see the loaded version of the hip hinge (e.g. the RDL) being utilized without ever having been taught, and it usually isn’t pretty. In fact, it is often cringe-worthy.
When I receive emails from coaches (generally sport coaches) who need some coaching cues to correct technique on select exercises, they are predominantly centered on the hip hinge. Thus, I thought it best to put onto paper (and in video, below) my teaching progression for the Hip Hinge, along with some tips for troubleshooting the athlete who has stubborn posture.
The Hip Hinge
A brief preface – what is the hip hinge?
The hip hinge, at its most basic regression, is a bilateral (two-legged) parallel-stance lower-body exercise that requires minimal range of motion from the knees, but large range of motion from the hips. In order to create any significant flexion at the hips without knee flexion, there must be a posterior weight shift (i.e. the hips must translate in a backward direction). I can’t understate the importance of this statement, so I’ll say it again:
In order for any significant flexion at the hips to occur without increasing knee flexion, there must be a posterior weight shift.
Without a posterior weight shift, it is not a hip hinge. In fact, it will become lumbar flexion (bending at the back) if the hips do not translate backward. This is an important reason why I use the Hip Hinge Wall Drill as my first teaching progression (more below).
Before moving on to the teaching progression itself, let’s discuss the goals of the hip hinge, and what the athlete should feel – points that are important to both the athlete and coach before learning and teaching the hip hinge, respectively.
What are the goals of the hip hinge?
- Learn to safely load the hips and posterior aspect of the body (hamstring, gluteals, back)
- Learn to maintain a relatively neutral spine when bending over and supporting a load while bending
- Learn to dissociate the hips from the lumbar spine and knees
- Learn to tilt the pelvis in a more dynamic movement than simply standing or laying
What should the athlete feel?
The athlete should expect to feel a stretch in their hamstrings as they move deeper into hip flexion.
The athlete should, in the initial stages of learning, feel their weight shift off of their forefoot and onto their heels (although as they become proficient we want them to stay on their whole foot).
And, yes, the athlete should feel their lower back – not in the sense you are thinking though. It isn’t pain or stress that they should feel. But, in a learning progression that is going to require them to bend at the hips slowly (eventually with load), sometimes holding at the bottom position, their [undoubtedly weak] lower back will be taxed and fatigue, thus they may feel it “working” and that is OK.
The Teaching Progression
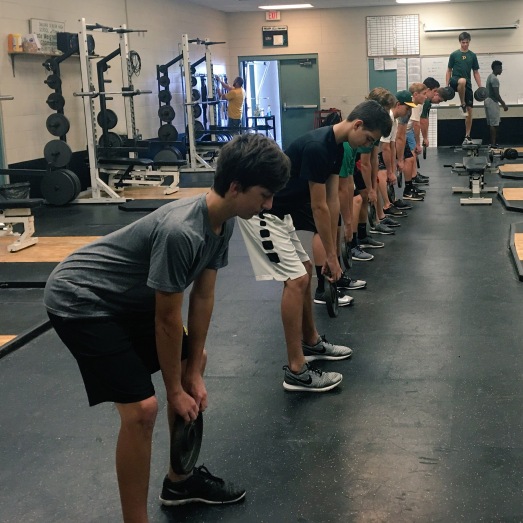
Initially I ask every athlete first learning the hip hinge to walk over to the nearest wall, and put their entire backside against it (including heels, hips, upper back, and head). The first real instruction is: “Feet right underneath the hips” as this is the optimal position for both the RDL (the loaded hip hinge) and all of its powerful counterparts (the clean pull, the clean, the countermovement jump, etc.).
From there, I will instruct the athlete to take a 2-3 inch step off of the wall. The athlete will hear for the first time standardized verbal cues that they will hear over and over for as long as they work with me. In the following order it goes:
- “Soft knees” referring to a ~15* bend at both knees, an angle we want to maintain for the duration of the hinge
- “Relax your arms and keep your chest up” to achieve a neutral thoracic spine before proceeding
- “Push your hips back toward the wall” and “tap the wall with your hips” in order to illicit a posterior weight shift
Next, I have them perform the movement 3 times, careful to ensure they are not putting all of their weight on the wall, but rather, that they are tapping the wall with their hips.
Only being 2-3″ off of the wall, they are not going to feel anything – and I am sure to tell them this up front. It is going to feel easy and pointless – and that is what we want. We are easing them into one of the most difficult movements to learn.
I then instruct them take an additional 1-2″ step off of the wall. With “feet right underneath the hips, and soft knees” I tell them to again push their hips back to tap the wall three times. They may or may not feel anything still.
Again, we take an additional 1-2″ step off of the wall. Now, I tell them up front:
“You may not get to the wall. The goal is to try to, but you may not. All I want you to do is push your hips back until you feel your hamstrings stretch, then return to the top.”
Over the course of three slow and deliberate reps I ask who is and is not feeling a hamstring stretch. I also go around to correct the usual suspects:
Too Much Knee Flexion
Oftentimes “soft knees” become squatting knees. In other words, instead of working their hips back to the wall, the athlete can’t help but bring their hips down toward the floor. In this case I will try two methods:
- I will get them back into the appropriate start position – soft knees at about 15* of bend, and will then instruct them to push their hips back. This time, though, I will place my hand a couple of inches in front of their knee and tell them, “Do not touch my hand with your knee.” If the athlete can make this happen, it usually cleans up quickly. I ask them if they are feeling the hamstring stretch now, if yes, bingo! High-fives all around.
- If it is a male athlete, I manually use my hands to gently pull their hips backward. Sometimes, if an athlete doesn’t know how to hip hinge, it’s because they have no clue how to shift their weight backwards. If they can keep their knees “soft” but can’t translate their hips posteriorly, sometimes all they need is someone to manually pull their hips back to show them what that hamstring stretch feels like. A band attachment can do this all the same, but if you don’t have the time, space, or equipment, your hands will work just fine.
Too Much Lumbar Flexion (Back Banding)

Another common culprit is too much bending at the lower back; the athlete has the correct knee bend throughout, they do shift their hips backward appropriately, but they still have too much back bend (a very harmful position for the spine, especially with load).
When this happens, many coaches simply want to bark, “chest up” or “flat back”, but if the athlete has no idea how to take these words and turn them into action (much like the weight shift issue, above) then we won’t get the results we are looking for. Thus, here is the method that works best for me:
- I stand the athlete back up, walk them over to a mirror (if you have one), and have them facing so that their left or right shoulder is toward the mirror (their side is reflected at them).
- I tell them to look at me first, and I demonstrate posterior and anterior pelvic tilting. I ask if they can do that, and then to show me, as they look in the mirror for visual feedback that should match what they saw when I demonstrated.
- Once they feel that, I ask them to get into the bottom of the hip hinge position, then tell them to tilt their hips just like when they were standing, so that their “tailbone untucks”.
- This anterior tilt tends to free up the lower back, and allows the hamstrings to accept the loading. Again, high-fives all around when the athlete finally feels the hamstring stretch!
There are other ways to teach proper postural alignment, such as using a wooden dowel behind the back to enforce contact at the lumbar spine, thoracic spine, and the back of the head. But, the method above has worked really well for me in large group settings.
Progression
Once the athlete has gone through the Hip Hinge Wall Drill progression with acceptable results, I will then walk them completely off of the wall. I, again, instruct that they should only descend until they get a hamstring stretch, then return to the top. We can work deeper into the range of motion once they become more proficient.
If you try to work toward any kind of depth goal, they tend to hit the hamstring stretch, then circumvent that resistance with lumbar flexion, thoracic flexion, scapular protraction, and/or knee flexion.
The next few progressions are as follows:
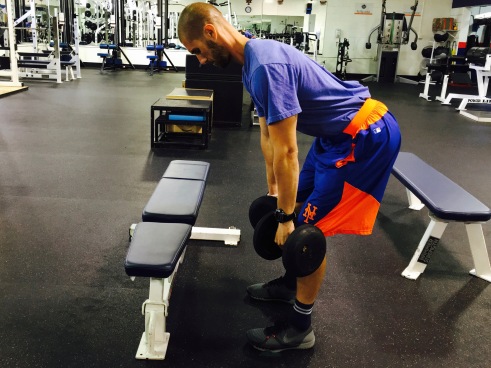
- Free (off wall) RDL with 10 lbs plate (or light kettlebell) with slow tempo*
The goal is to get them to continue shifting posteriorly and hinging correctly, but now getting used to holding a load.
The bar generally poses too big of a challenge though; not just because of weight, but also because of its shape. Because the bar sits sightly in front of their center of mass, it tends to translate further away from the body, instead of being kept close. The 10 lbs plate, on the other hand, can be directed right along the frontal plane that divides the body, without hitting the legs at all. Also, because the bar is heavier, athletes tend to work very hard to hold it, oftentimes concentrating their efforts on elbow flexion and grip rather than the hinge itself. Remember, we want the arms relaxed at this point.
*The slow tempo that I begin with is 3 seconds down (eccentric), 3 seconds holding at the bottom (isometric) and 1 second up (concentric), giving them plenty of time to feel the movement and become adept at making adjustments so that they continue to feel the hamstring stretch as they descend.
- Free RDL with 25 lbs plate and slightly faster tempo
The tempo moves to a 3s eccentric, 1-2s isometric, and 1s concentric. As the load increases, the isometric hold will decrease because this becomes a more stressful and harder position for the lumbar spine.
- 35 lbs plate or Barbell with controlled tempo
Now that the load has gotten significant, I may still keep the longer eccentric phase to develop strength, but will reduce the isometric hold to a brief pause or no pause at all.
The athlete will then slowly progress the exercise in intensity, volume, tempo, etc. like any other movement.
***
While this isn’t the only way to learn and teach the hip hinge, it certainly has worked for me. The most convenient part though, aside from the fact that it works, is that it require no implements (wooden down, bands, etc), only patience, consistency, and a keen eye by the coach.
For a visual demonstration of this entire process, watch my RDL Teaching Progression Video:

Leave a comment